Rain Cycle

Science is the favourite of Joshua. For understanding the rain cycle we did 2 experiments at home. 

First I had to explain how water evaporates into the atmosphere or sky. We got a cup and a cover. We poured hot water in the cup explaining how the sun causes heat on the water. We covered the lid of the cup with a DRY plastic cover for about 15 minutes.  When the time was up, Joshua noticed that the plastic cover was filled with water droplets. This made him understand that heat makes the water evaporate.

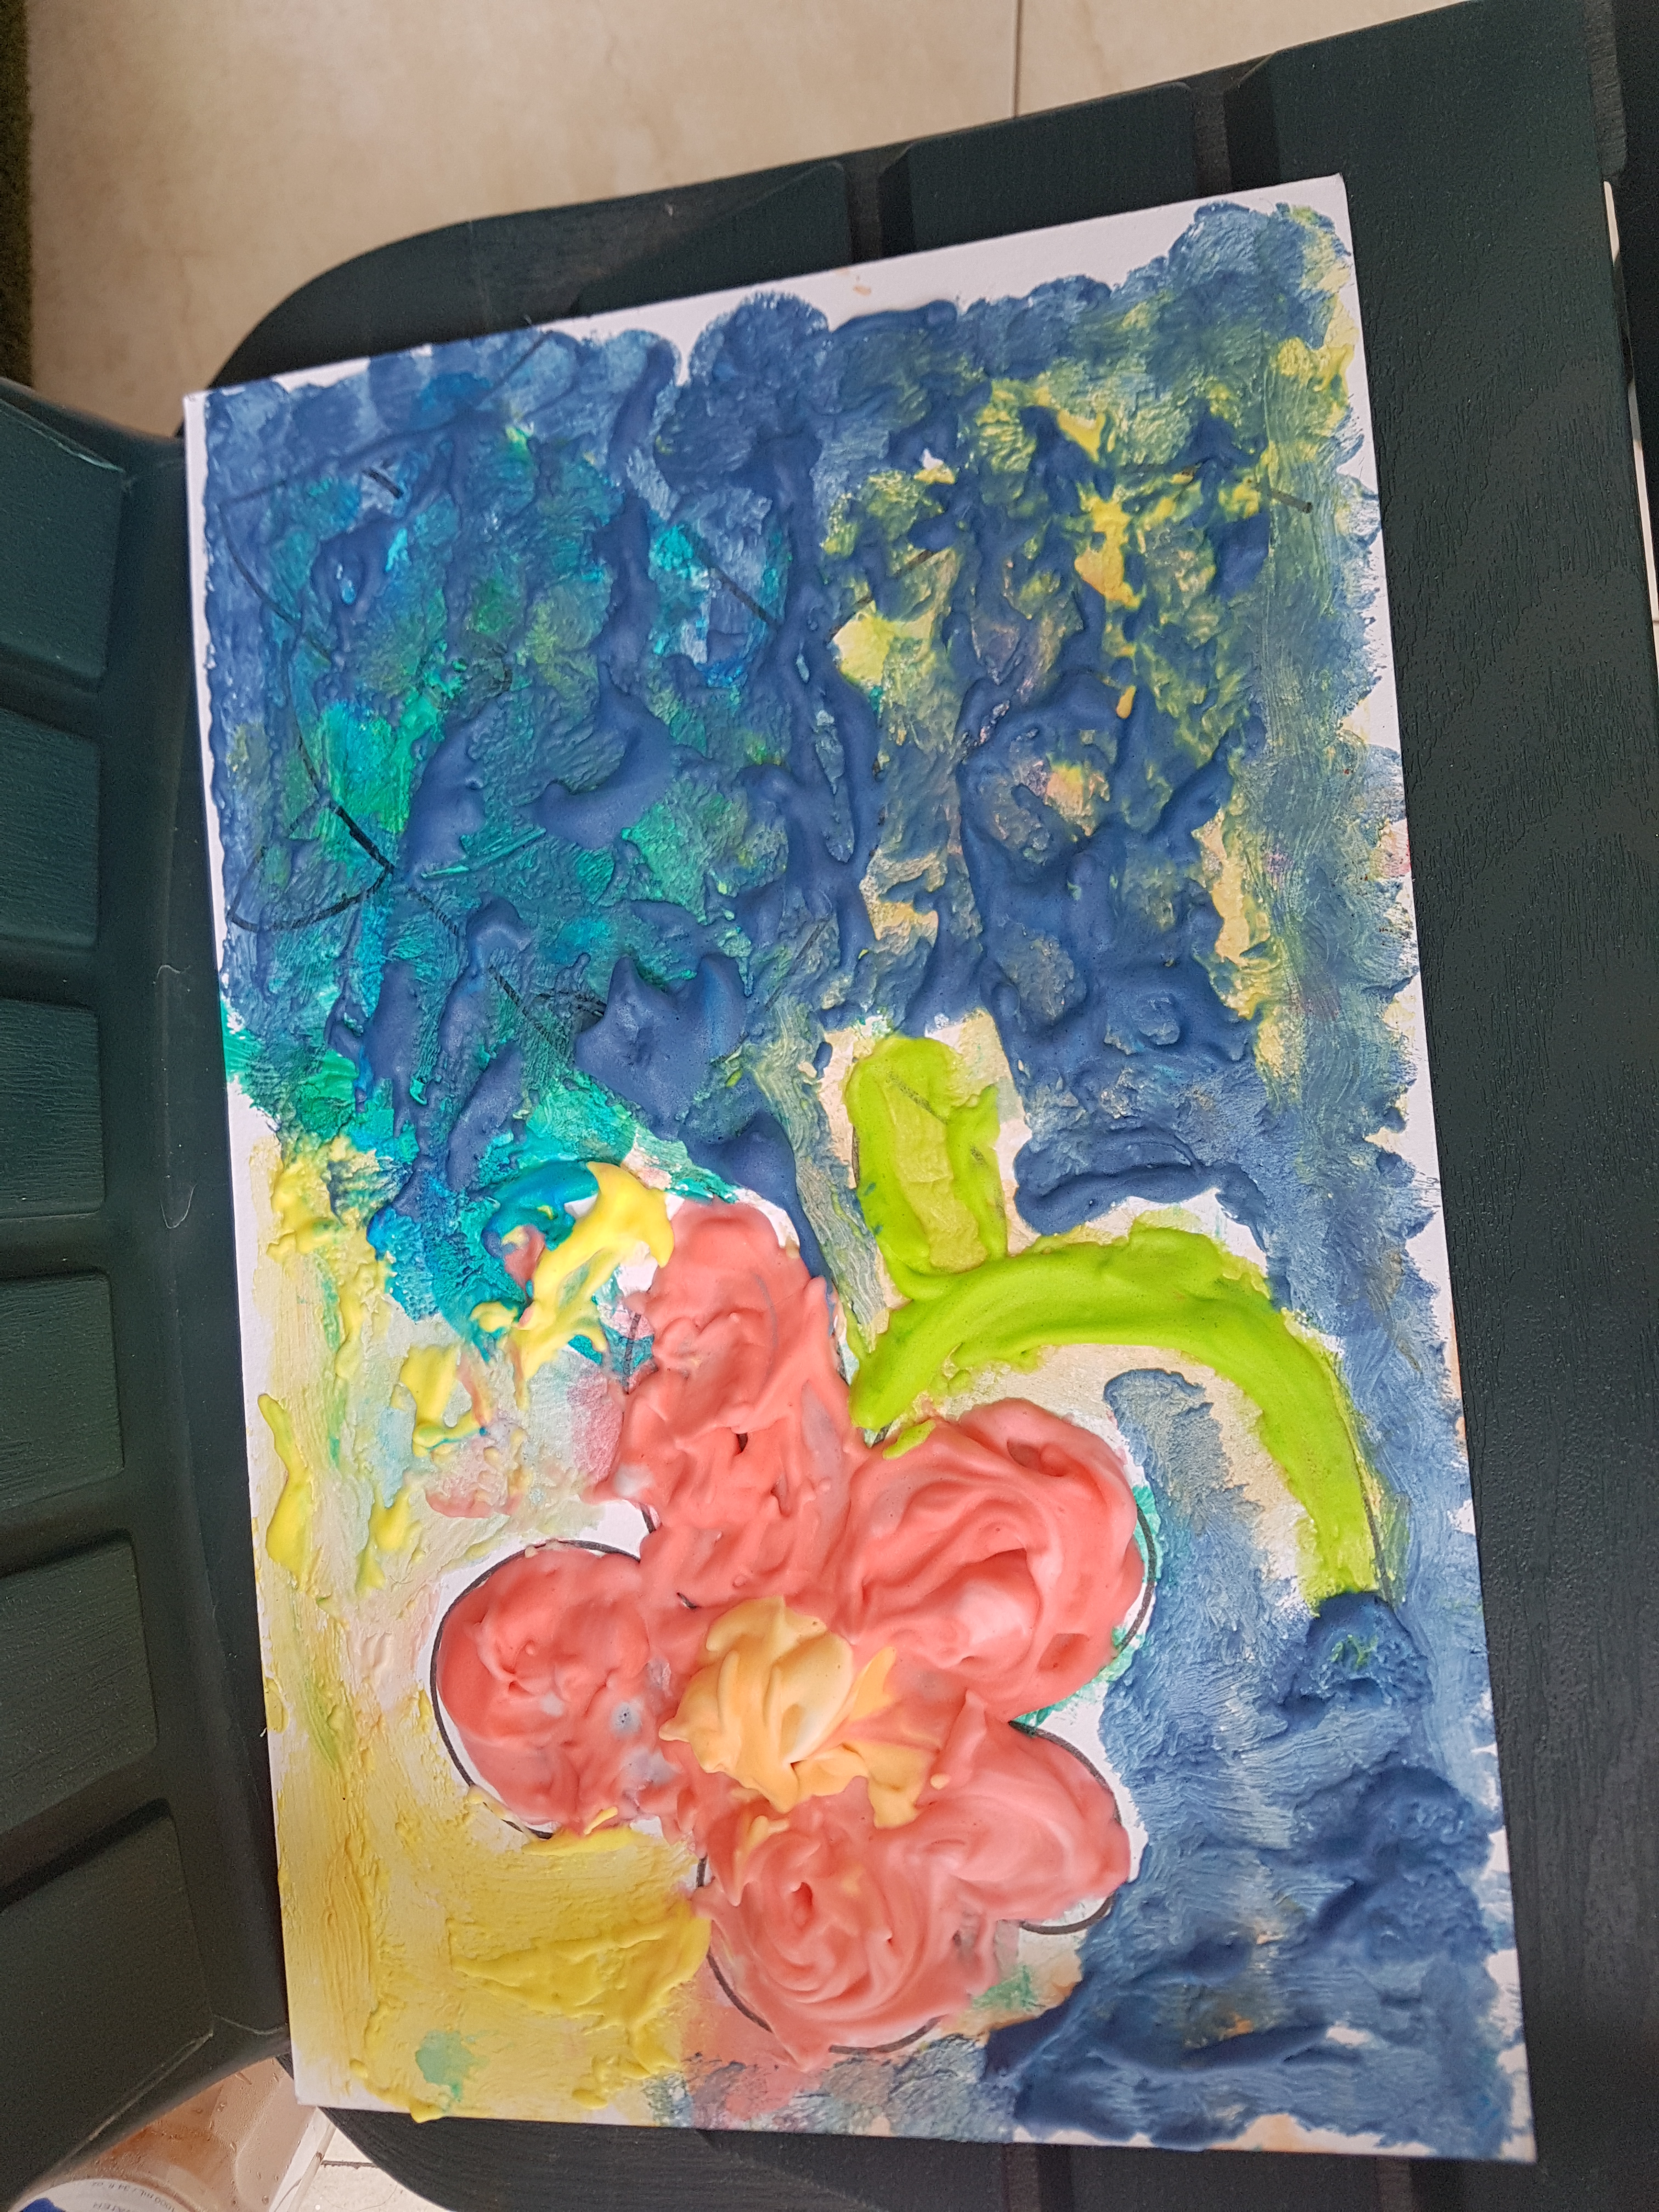
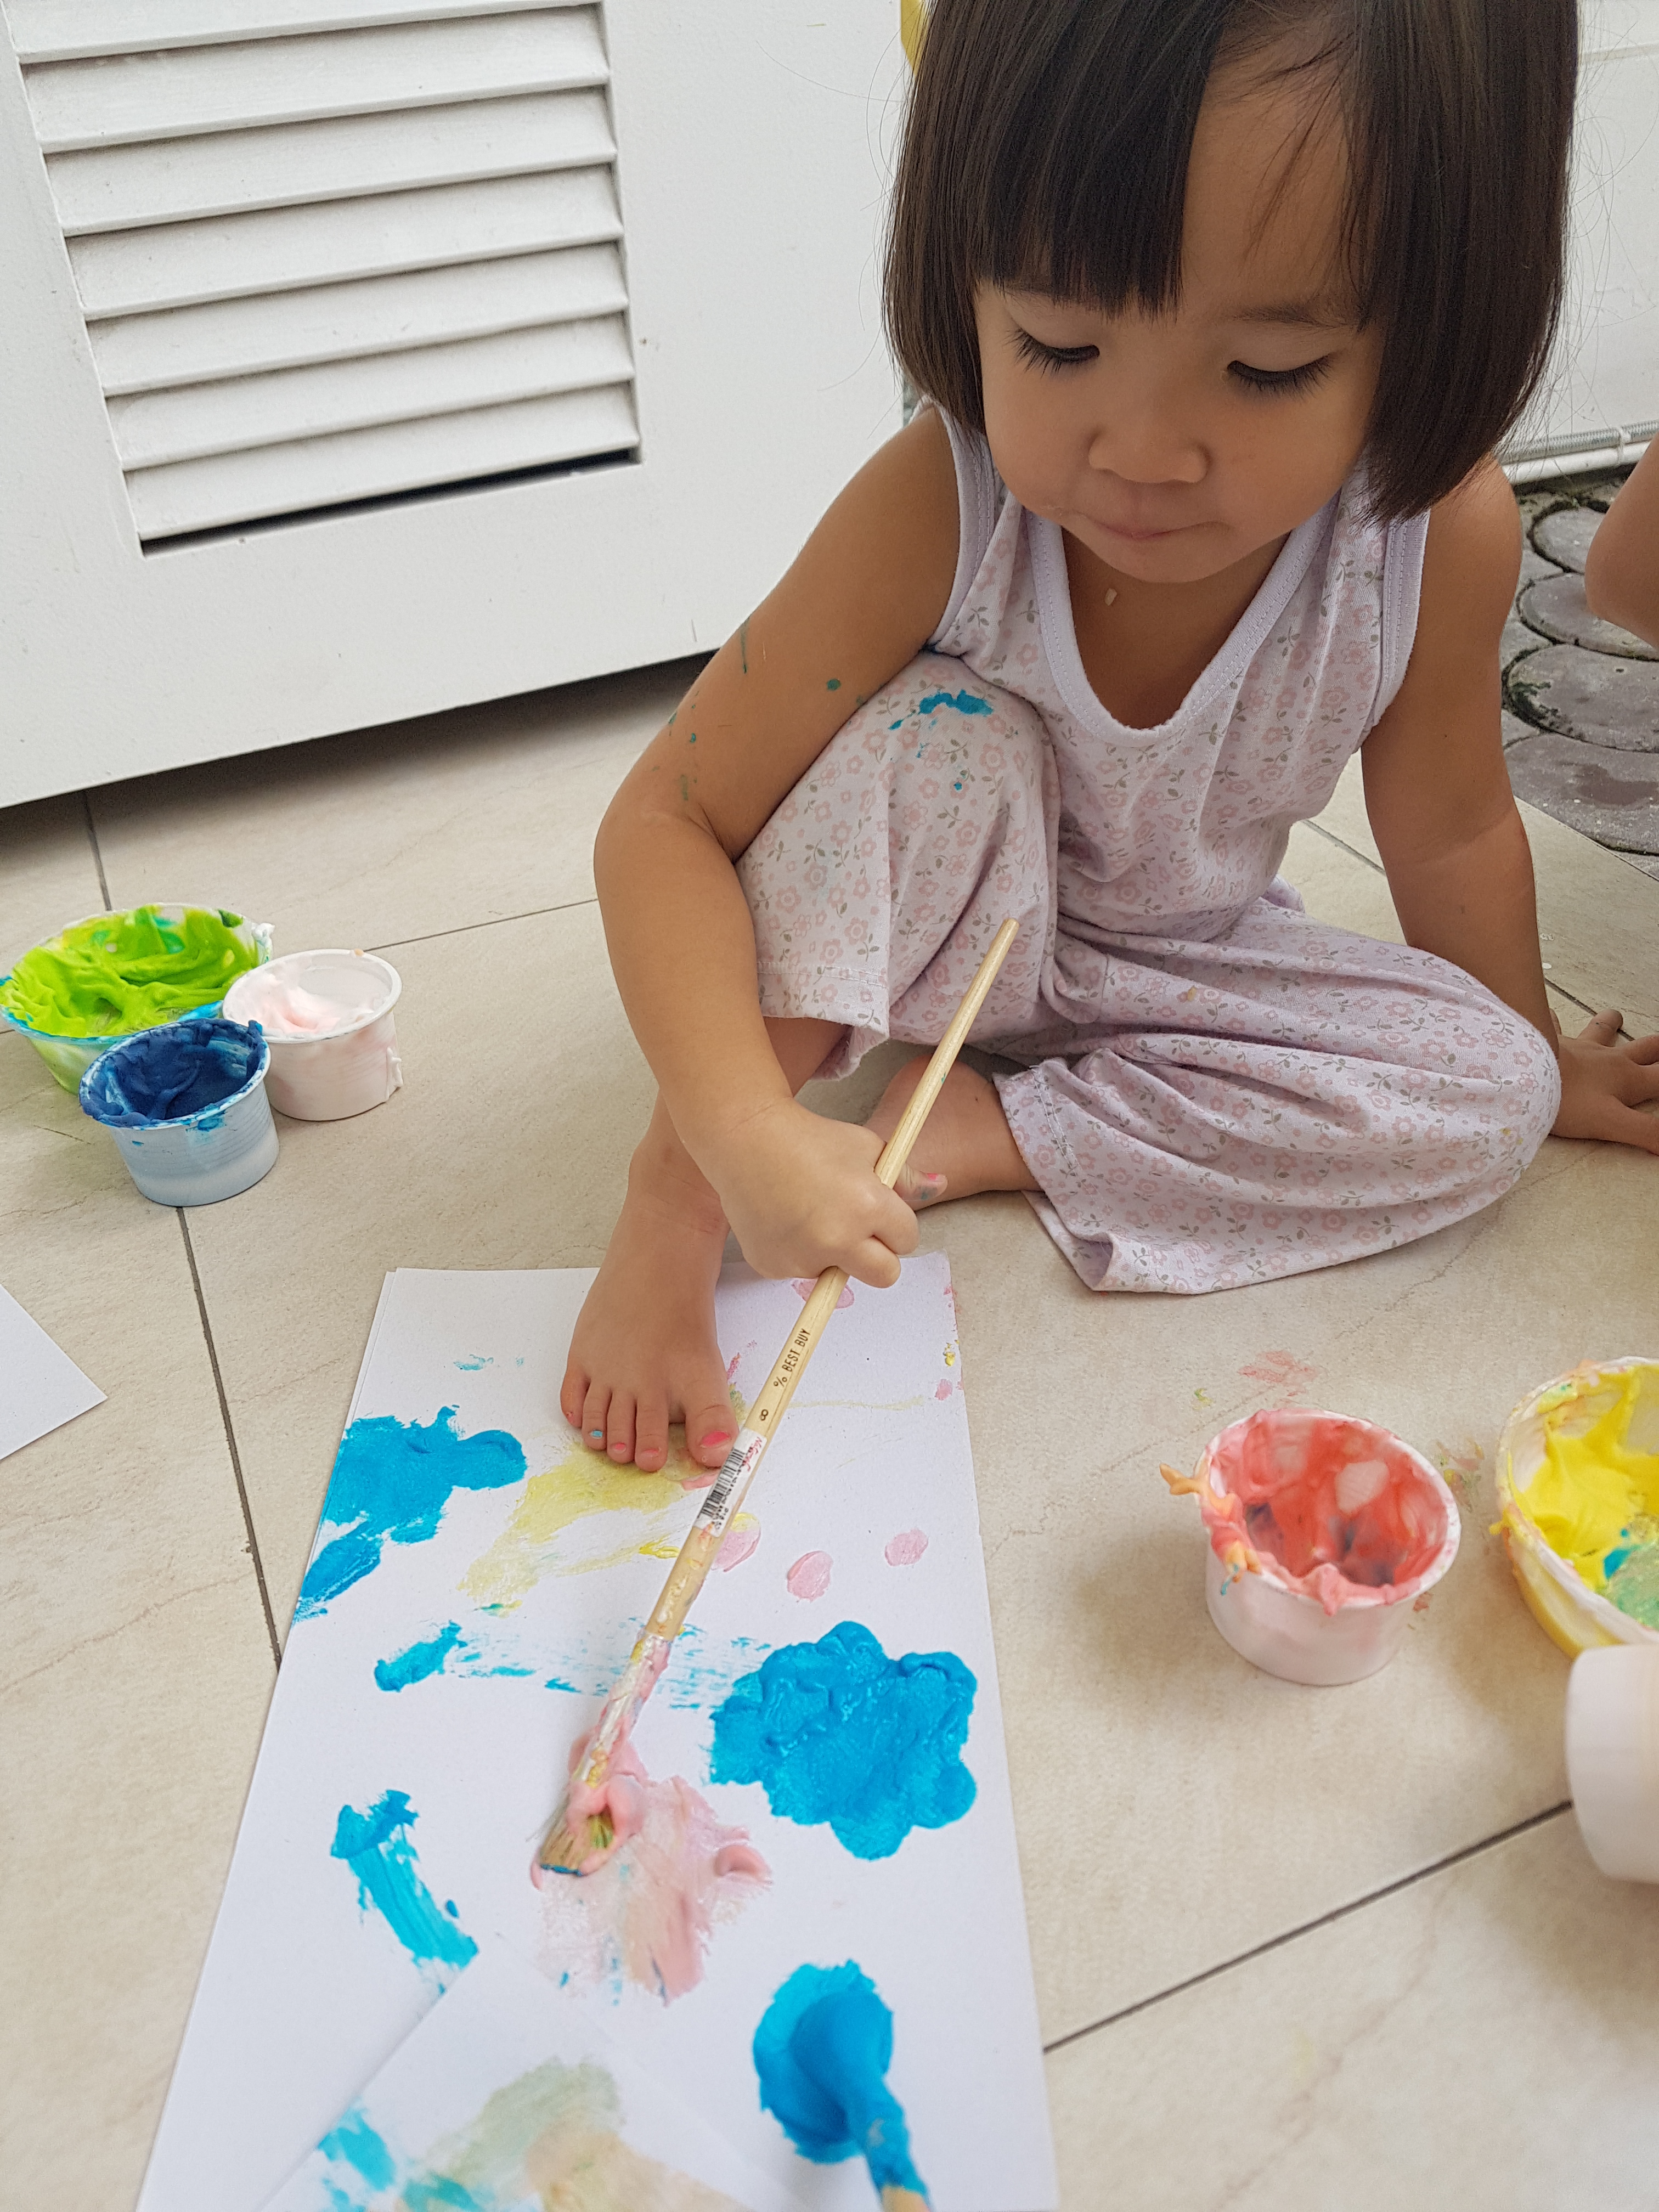
Our second experiment was more fun… explaining Precipitation or Rain. We used a clear class with water about 3/4 full. With a little air space in between, we sprayed shaving cream on the top.  Then with blue colored water (using blue food coloring) and a dropper, we drip over the “clouds” and see how raindrops form.
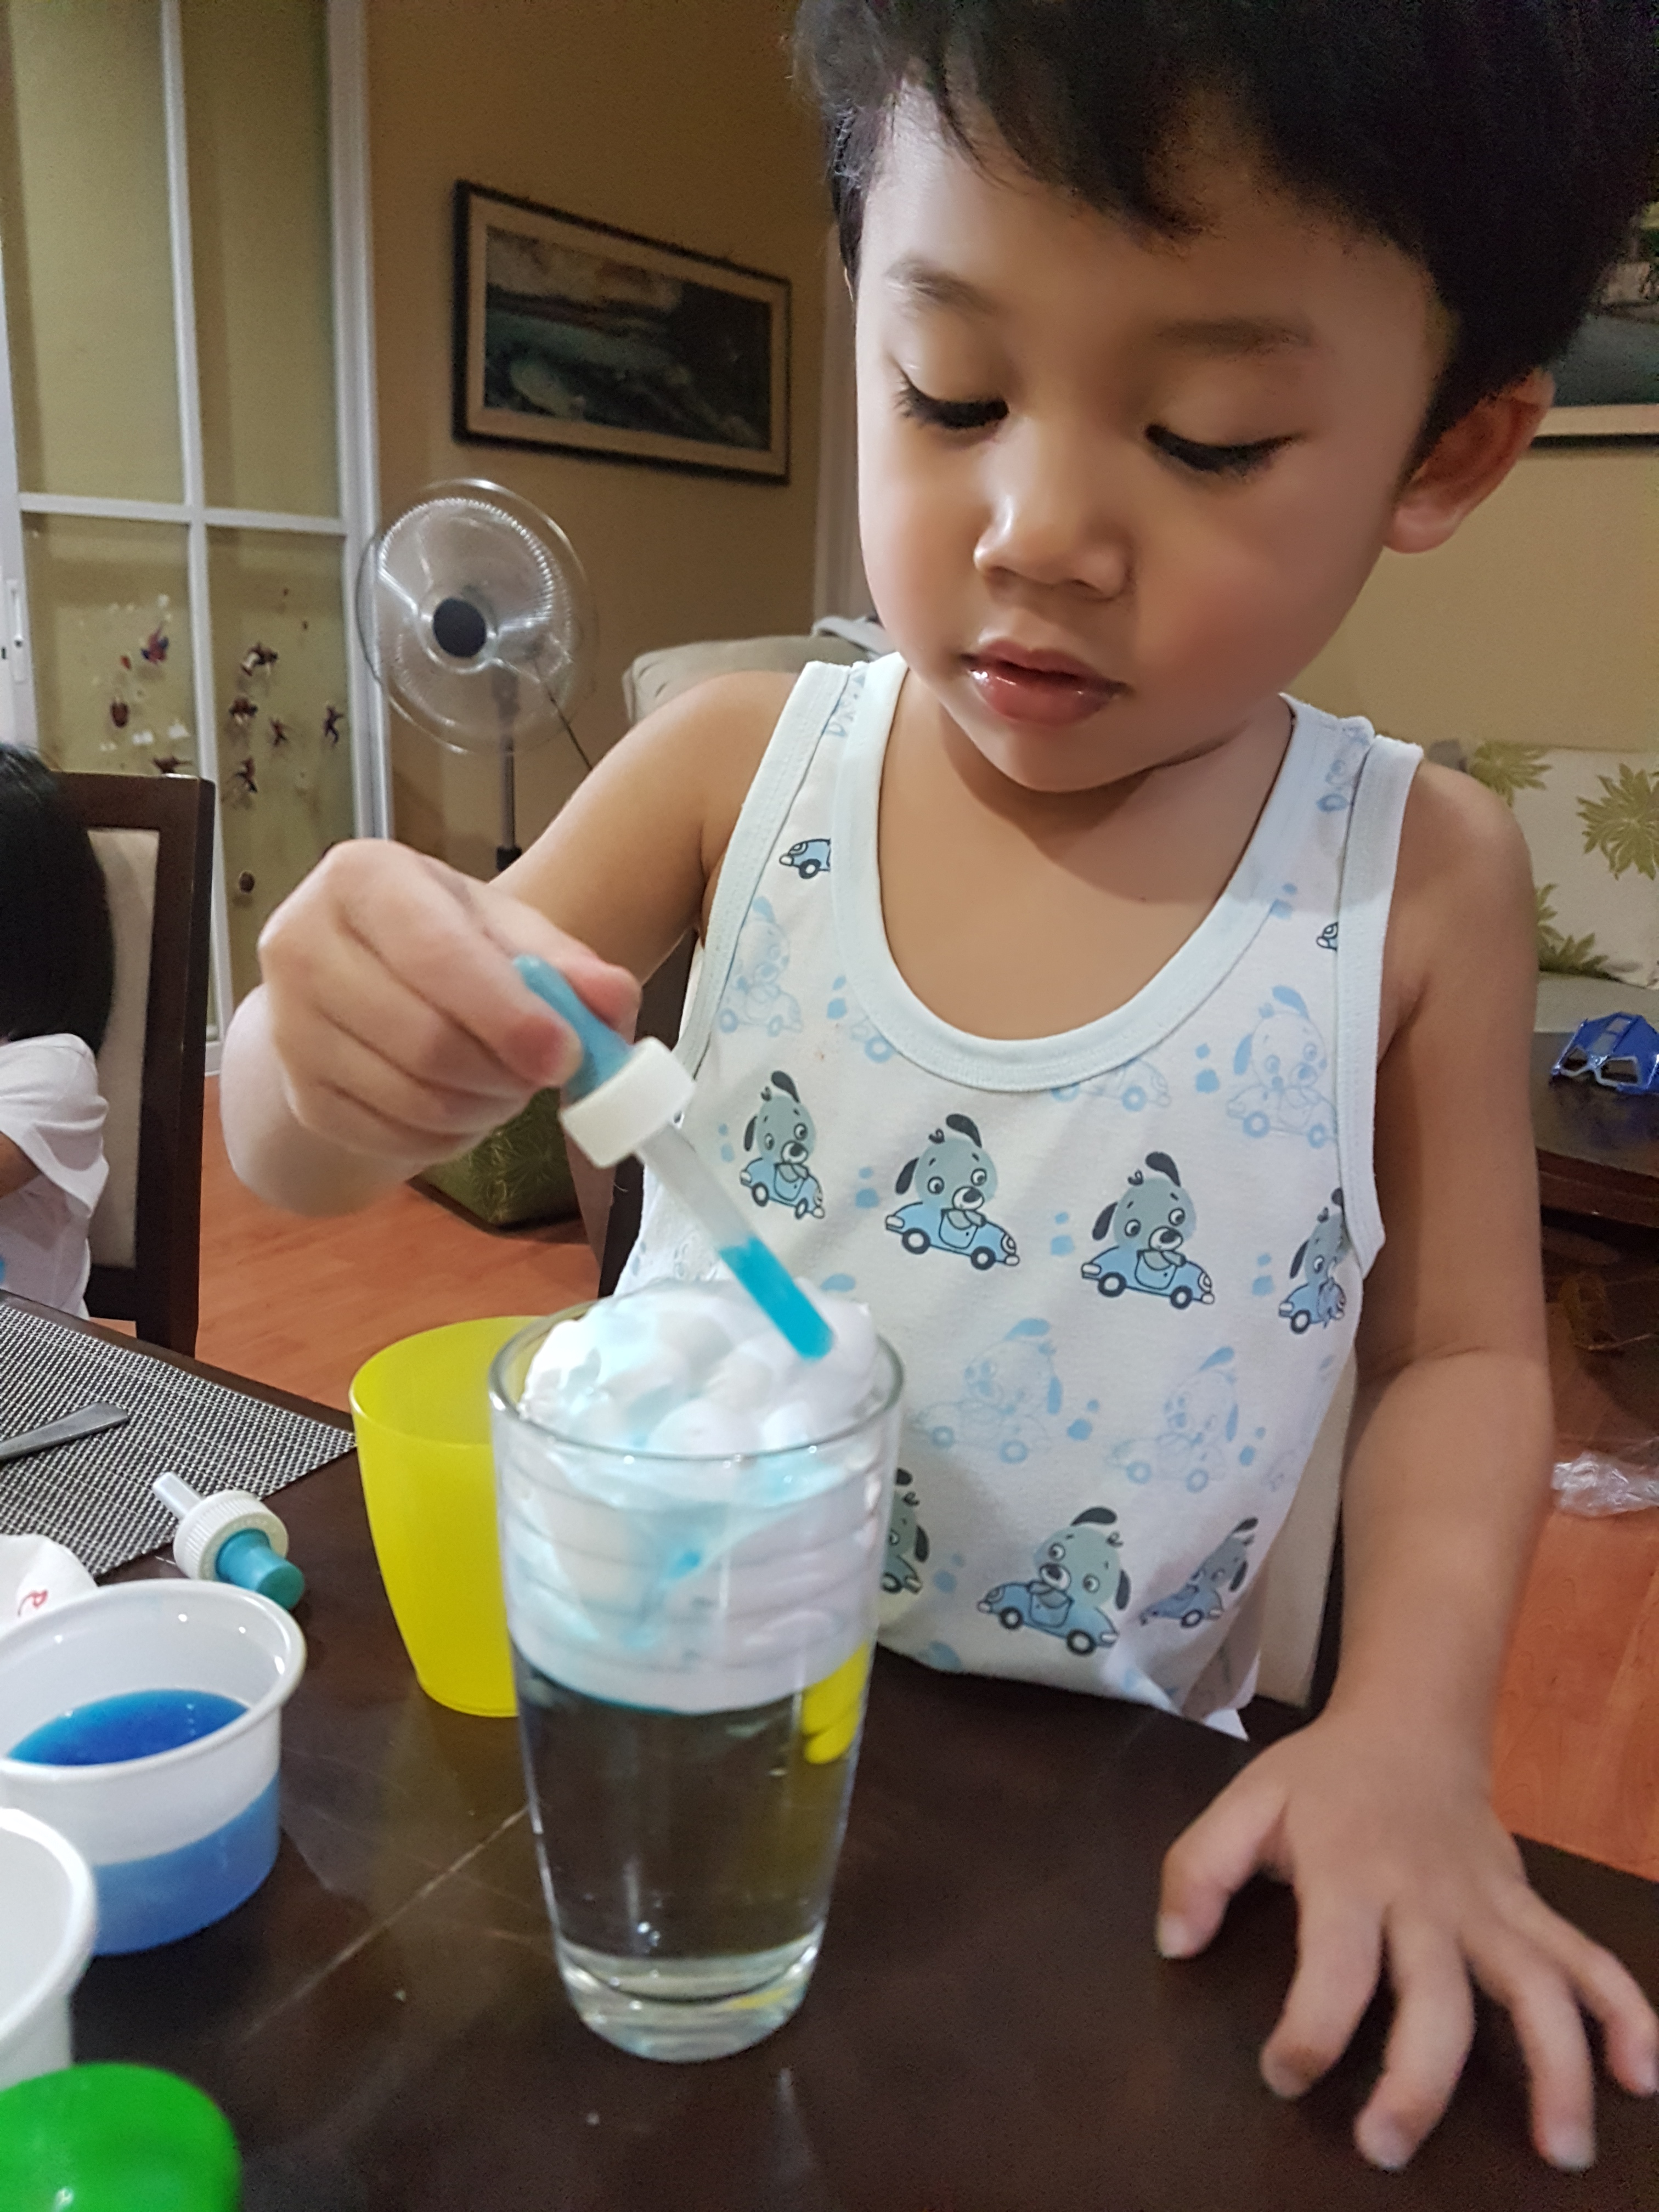
Rain experiment

Blue water drops below

This was absolutely fun and educational! The shaving cream has been a good medium for us… from puffy paint and now to the rain experiment. 

Doing a live laboratory at home makes science interesting and fun!

Advertisement

Puffy paint is fun!

After using water color for some time, I needed to do something different for our art class at home. Homeschooling can make a mother smarter because she has to find ideas to do at home with the kids. I bumped into the puffy paint idea in Pinterest and it’s pretty simple.

Ingredients are:

Elmers glue, shaving cream, food coloring, paint brushes, plastic containers and paper.

We mix the glue and the shaving cream in similar proportions in a plastic container. Then move into smaller containers to make different colours with the food coloring.

Once the colours are mixed, it’s time to do some imaginative works! I’m teaching my kids to have some fun by putting texture on their painting.  Joshua decided to do a butterfly, while Anna and I did some flowers!

Butterfly by Joshua

Flower by Anna

Flower by Mommy Mit

To dry this puffy painting will take 24 hours. So don’t be in a rush!  We had so much fun in painting and in cleaning up the containers and brushes! 

This activity is worth trying at home. Both my 4 year old and 2 year old had a blast!

Plant Life

A great way to understand the cycle of plant life is for our children to see it first hand. So part of our science study is to truly see the cycle from seed to plant.

We took some monggo seeds and see what happens in 5 days. This project takes a little patience… Because we observe what happens every day.

Day 1 – We soak seeds in water. We leave it out where the sunlight can reach it. Three major things my children learned is that life needs air, water, and sunlight to thrive.

Day 2 – we observe many of the seeds grew in size and their old cover starts to wear off.

Day 3 – we see roots starting to grow out of the seed. This time we move them to their cups with soil. Don’t forget to make holes underneath so water do not drown the seeds.

Day 4 – The good Lord has brought showers and some hours of sun.  So we left our monggos alone. We let our little farmer play some golf instead! 

Day 5 – My little farmer was so elated to see that his seeds have now grown with stems and leaves. Many of them have rooted themselves well.

What a joy for kids to understand the reality of life and nature. We may plant, we may water the seeds, but truly it is God who causes the growth! 

Letter brain practice

When Joshua saw the wooden cut out letters I bought, he was so thrilled! He was excited because it came in many colors and looked like fun! So I used it to make him look for the right letter to spell words.

Then we tried a different approach. He had to find all the right letters to all 26 letters of the alphabet. He worked hard on it! After A-G, he was already breaking a sweat.

The reason I believe he was challenged because he had to complete 26 letters. Well I encouraged him to go on and he probably finished this activity in 12 minutes! 

When he was done it felt like an accomplishment. But he was also so tired looking for the right letter to match his chart.

I’m so happy he never gave up and was able to succeed in this task. This is a good activity to do at home.

Alphabet Fun! 

Recently my two year old is trying to recognize his alphabets one by one. But I realized to make it effective we have to practice it by singing and showing all the letters alternately with one by one letter a week. 

This week I challenged to sit with him and make my own alphabet chart. I used the magnetic letters as a matching game. This is the first time I am attempting this activity and I am very happy to say Joshua did very well. Singing helps too! 

  
So when he saw me make this, he just could not resist to play. We sat on his table so he would be really comfortable. What we did was randomly pick letters and he would try to match on his alphabet chart. Everytime he would get it correct, he would get a second stick (and lots of cheers from me). When he gets confused we would sing ABC and point out the letters as we sing. 


When he was done he was so happy that he did not want to return the letters back in its box. He was beaming with confidence that he mastered the game! 

This so easy to do at home. The plastic letters with magnet can be bought for about P100 (or $2.25) in the bookstores or toy store. The alphabet chart you will need a pen and 1/8 illustration board.  All these are inexpensive. But, having the parent as a teacher is priceless! 

Colored Rice

Looking for something new to do, I stumbled upon some ideas on rice as a tool for sensory play and learning. So off we went to the kitchen and got some rice. Little did I know that my son would love this little project! 

First I prepared 4 ziplock bags and placed about a 1/4 cup of rice each bag. Then we got some food coloring with water and placed one color per bag. We prepared to do 4 colors.  After about soaking them for 15 minutes, we removed the excess water and drained the rice. Later, it was ready to be air dried.

 
But since Joshua and I were getting excited to play with the rice, we opted to use a hair blower and cloth to help us dry it quickly. 
Once it was dry,  the rice can be used to hide alphabets that he could guess. I tried to do one alphabet per letter. However, as we began playing that, it was not easy to keep every rice grain to stick to its proper colored bowl. Later, Josh wanted to mix them all and it was actually cute to have mixed colored rice! 


As I left Josh to explore with the rice on his table, he was making lots of artwork with his hands. First he was making circles. Later his imagination just left him to play there for almost an hour! 


This was a great sensory and learning tool for the day! Even the process of making the rice was such a great bonding experience for us! 


Colored Ice! 

Thinking of painting in a different style, I tried to follow other moms who use food coloring and water. The new idea is to put them in a ice cube tray and freeze them!

  
I placed Popsicle sticks a little early, so my ice cube tray looks like this. It still was as good because it still was able to pull out the colored ice cube. My son was excited with his new medium for art! 

  
What we used was a cartolina paper. I also recently ordered some tables and chairs from a dear designer friend, Rain Ramas. This is where Joshua can do his activities. I find it so important that Joshua will be able to reach and do things in his level and height.

  
Okay, my son started to talk about what he was doing and he has some application from our recent visit to Mind Museum. He said that he was making planet earth with the stars! A little bit of science input there. He is beginning to understand that we live in planet earth and that there is a sun and moon, with other stars and planets. The movie “Home” also made it clear that there is a big universe or space out there where the stars are, and that we live on planet earth. 

  
I am seriously amazed at my son’s growing knowledge and imagination. This was the first work he did on ice cube paint! It was so fun we ended up having to do another cartolina paper. But Joshua ended up letting our dog eat the remaining ice and he enjoyed eating this edible colored ice too!

  
This is really one fun, fun, fun activity for 2-3 year olds. But I say, even a 38 year old mom like me, enjoyed it too! 😄😄😄

Of Banana and sticks

Fine Motor skills are important to our toddlers. It just helps them strengthen those hand and arm muscles. It also practices hand and eye coordination. 

I find myself musing on what activity Joshua should do so he can practice his fingers and also get an experiential learning experience. So I started with the banana. Using a table knife, I would ask Joshua to slice into smaller pieces the banana and of course he has to eat these small pieces. 


These activity teaches him to control his hand muscle and also to accurately slice without touching his little fingers. He loved slicing, that he felt like he wanted more than just banana to slice.

Another activity for fine motor is getting those pick up sticks for practice.  I get a paper cup and mark the bottom with black dots. From the black dots, I create holes at the top with a safety pin or needle.  Then I get a pick up stick and make the holes big enough to slide the stick through.  Draw a little face of the cup and you will see that as your child places a stick on each hole, he adds colored hair to the face! 


Another home made innovation I did was with a box of Joshua’s toys. It was meant to be thrown but instead I decided to cover it with colored paper. At the top lid of the box I  drew a face of a little bear. I made horizontal slit as the mouth so that the Popsicle stick can fit. 


In this game, I make Josh feed the bear with Popsicle sticks. He would slip the sticks through the mouth of the bear. He was so happy he could actually feed the bear. He continued playing “feed this bear” game for hours and even days! By doing so, he actually does fine motor skills.

  
I thank God because these activities are all done at home and are very simple. No need of elaborate materials — I honestly just recycle and upcycle stuff I see at home. These activities are so fun and easy but have great benefits for those little fingers of our 2 year olds! 

Math concepts for 2 year olds

I have been contemplating about teaching the concept of Math to Josh. He can already tell numbers 1-10 and he is exploring 11-20.  Looking at numbers helps memorizing the look and shape of the number. But how about the concept of the number?  He sort of understands because we count the picture items on number books. 

 
I am praying I will be able to teach him addition and subtraction soon. But first, I must establish his understanding of what the number means.  We try to count things like his cheese and pomelo.

So I decided to do a game with Josh. I will put a number card and an empty container beside the number and a bucket filled with blue bead balls. The game works like this… I must put a number card and then he must put the corresponding balls by counting. Then if he correctly gets it, he gets pieces of his favorite snack. (Ok, it’s chips and I know some moms will debate how bad this is for my son. I agree with you… But for example sake, please bear with the illustration).

 
When he answers correctly he gets a reward! 


Of course, in the beginning I needed to coach him how to do it.  I did it about twice until he did it himself. The trick here was to just let him do it himself.  When he holds the balls and gets to count them, it helps in grasping the concept. We have to keep practicing so that he would get better and better. If we keep at it we can start doing math concepts such as addition and subtraction soon. I am looking forward to that day!